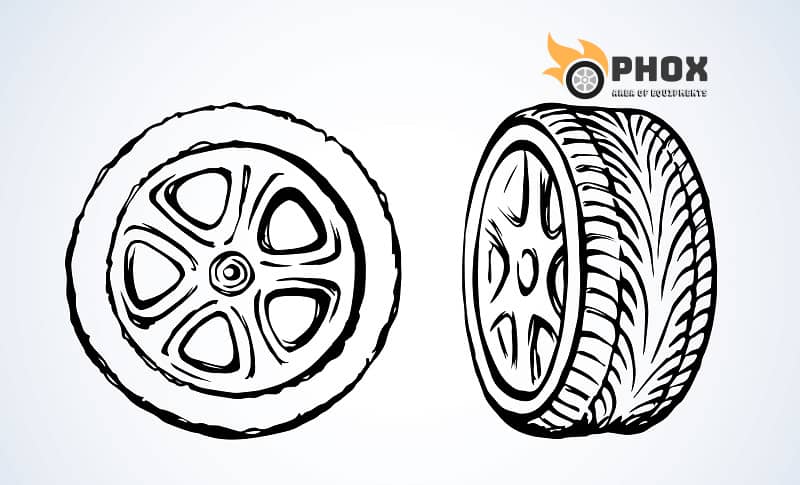
We are going to discuss drawing wheels and to cover the discussion you really need to have good knowledge about wheels. I find when students are trying to draw cars or other vehicles that have wheels, they have a tendency to not quite study those wheels carefully enough.
On top of that, the wheels themselves have so many characters to them specific to the vehicle that they are on or the type of wheels that they are.
It is a great little microcosm of a lot of the complexities that goes into cars where cars have such a specific configuration of curves in all three dimensions. If you get that curve or those curves and the relationships between those curves wrong, you may quickly move away from the car that you are trying to draw to something that looks entirely different.
Nevertheless, it is very difficult to pin down why and when you are dealing with wheels. You have that same kind of challenge but at a much smaller scale and it certainly helps that those wheels are also part of those larger vehicles.
So we are going to look at the construction of a wheel and how it differs from just a regular cylinder and some of the things that people tend to miss.
How to Draw a Wheel


Step 1- Draw a Horizontal Line

Firstly, as with any cylindrical object or cylinder like object we often start with a minor axis. You will also find yourself constructing a wheel inside of a box which is usually what we are going to do and we are drawing cars.
But for now we are just going to focus on arbitrary floating wheels in space so that we don’t have to worry about the extra complexity that comes with constructing inside of a box. We will just work off the minor axis.
Step 2- Starting With The Ellipse
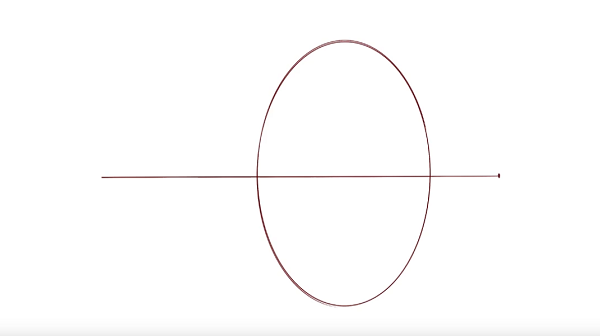
Starting with the ellipse, from this side, the ellipse represents the side that we are mainly looking at. We will generally draw these wheels in a 3/4 view kind of thing where we can see some of the fronts and some of the sides. It is not going to be rotating in any crazy way because most of our wheels generally are sitting on the ground. Thus, a kind of two-point perspective, each setup is usually good enough in most cases unless you are drawing cars flying through the sky and way above. In this case, you will be able to figure it out among all the other challenges that go into such a difficult childish thing to draw. So turn off the red for some of those learners.
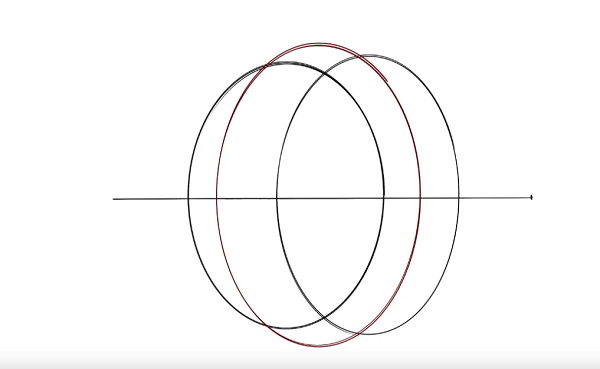
Step 3- Add Another Ellipse
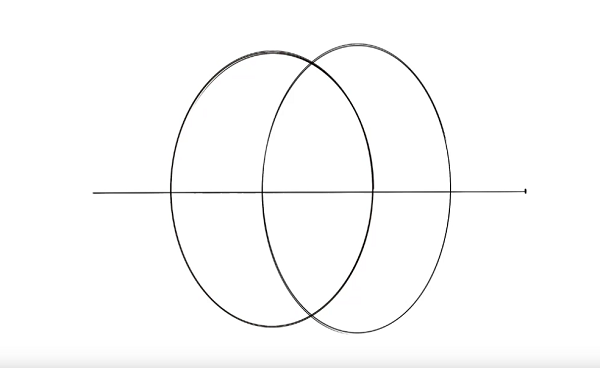
Now I am adding another ellipse. This is where most of the people will think okay well you have got your cylinder. You just draw your lines on top and below and you are done that is not the case because wheels are usually not such perfect cylinders. They vary from wheel to wheel.
Step 4- Add Few More Ellipse

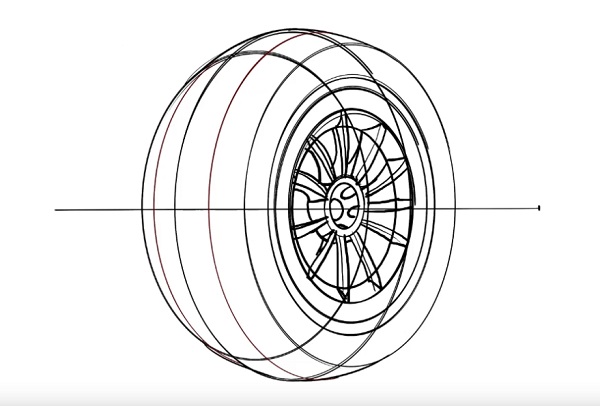
However, we are going to exaggerate it by adding an extra ellipse roughly in the center and as always with cylinders and cylinder-like objects.
Then, as you can see here, I have drawn this middle ellipse to be somewhat larger. It bumps out at the top and bottom and if you could rotate this you can see that it would do it on all sides. It is just larger on the same minor axis.
The reason is that these wheels and their tires specifically tend to balloon out a little bit. It depends on how much but usually you are going to get a visible bevel at the very least where this front face is a little bit smaller than what comes up immediately after it.

It is not just a regular like a Pipe cylinder. It has much more going on there, much more curvature. So, as you can see here we have got the full, coming up and down, a nice curve to this non cylindrical wheel.
Now I have drawn all of these ellipses with an ellipse tool in Photoshop. I use lazy Nezumi to do that. But when you are drawing these, I strongly recommend that you get yourself some ellipse guides.
They can be expensive but you can usually find them cheaper on places like eBay and other online sellers. So, if you immediately see a really expensive one being sold, do not assume that they are all priced that high. Other students have used those with access to 3d printers and laser cutting and stuff like that. Yet, I can assure you that it is a very worthwhile investment in getting ellipse guides.
You should get them just because freehand ellipses can be very difficult. Especially, when you are going through all the trouble of designing a vehicle or all the observational elements that are involved in drawing a vehicle being able to cut down on some of the technical work. Besides, focusing just on that observation and construction can really go a long way at the end of the day we have been practicing our freehand ellipses through all of these courses.
We have been free handing them up until lesson five. However, it is sometimes sensible to just cut yourself some slack if you cannot freehand them to the best of your ability. Except that they are not going to be perfect.
Step 5- Add Concept Concentric Ellipses
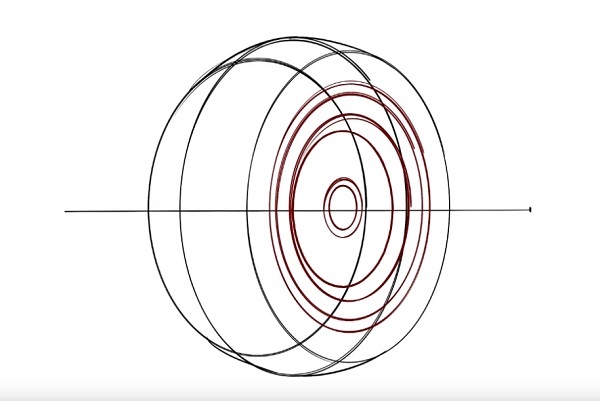
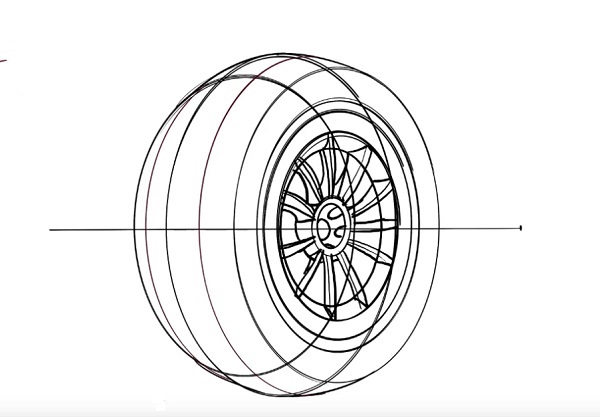
The next step here is that I have drawn a number of concept concentric ellipses and most of them are concentric in that. They are all positioned in the same place. They are just getting steadily smaller.
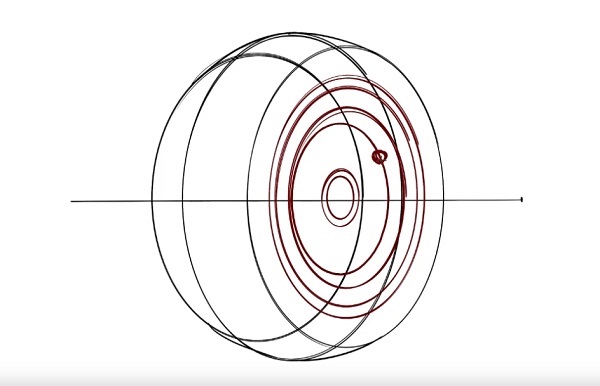
I have inset as you can see with this one here, it is slightly in which is why we start out much further out from the ellipse, that is directly around it and we end up further in here. Thus we are achieving the kind of push in effect that we get with the wheel. Well they are not the wheel, the hubcap and that whole section of the wheel. That can help give dimensions.
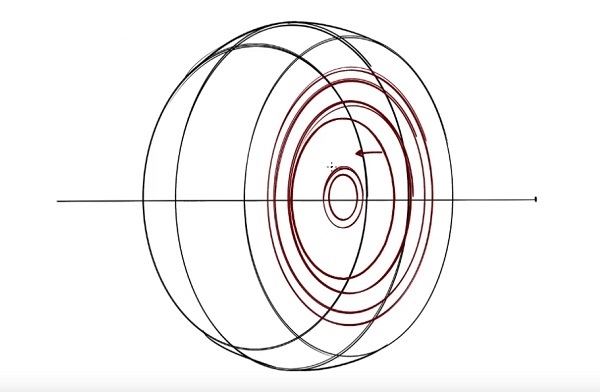
So, you are not just going to be drawing a simple, just continually going flat like that. That is not a wheel. A wheel has a lot more going on where you might have all these outside and concentric ellipses.
But you will have parts that tuck in inside, you will have a bevel. There is a lot more interesting stuff going on over there. So you can see that your wheel should not feel like sushi rolls, they should feel like they have got dimension and that they are bubbly a little bit.
Depending on what kind of vehicle you are working on and what kind of wheel you are looking at, it will be bubbly to a different degree. Some of them are not that bubbly at all but they at least have some of the beveling and the curvature, you are never going to see them without it.
You do not necessarily have to jump in and draw all these concentric ellipses right now. I have mainly done that because my tool, I have to move it around and I can slide it along the minor axis very easily. Then again, as soon as I move it away, it can be a little bit tricky to get it back into the right position with the correct degree that I cannot remember which one I use.
So, in general keep in mind which degree you have used for these major ellipses, so as to when you are drawing an ellipse that is directly inset or inside of it.
You do not have to start figuring out which one you used, writing those numbers down because they are to note it down in any decent ellipse guide or ellipse template. So, you can easily keep track of those things.
If you use the wrong degree, it will communicate something entirely different from what you are intending. Anyway, you do not have to draw all these concentric ellipses here right now. I have just decided to because that was the easiest option when you do get around to the building.
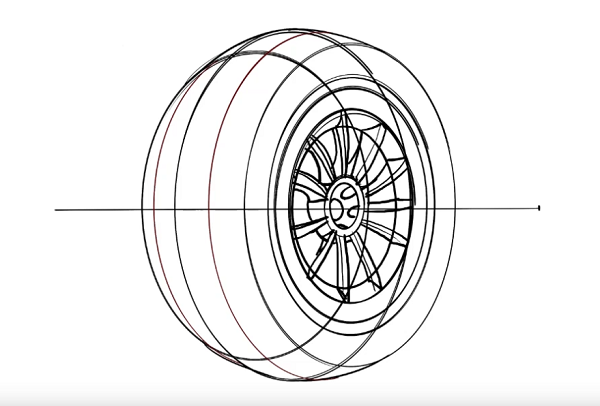
Step 6- Add Hubcaps and Rims
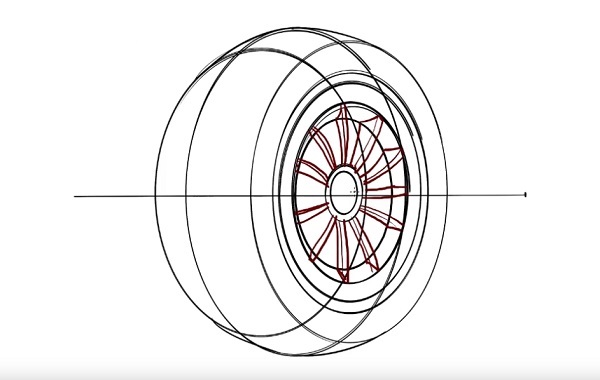
In the detail of this section, reference is pretty important. There are all kinds of different hubcaps and rims and in but not on vehicles, on wheels rather. So, you want to try and use proper reference to identify what kind of detail you are going to find in there.
Step 7- Add Rims Details
As you can see, I was pushing them with a little bit of reference, a little bit of experimentation, doing it right from your imagination when you have not really looked at the wheel as much. It is not going to do a lot of good for you. This kind of exercise on the other hand will help you pull information from that reference and keep it in your visual library.
So, down the line what you have learned from doing this and will help you, you are just not necessarily going to be in a position to be able to make up entirely plausible rims just from the top of your head.
Using reference kind of they are all just like small cylinders and you have got little bits coming out and trying to space them out evenly and don’t be afraid to make mistakes.
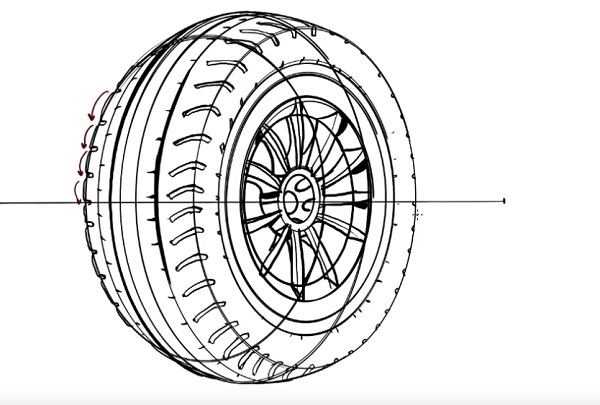
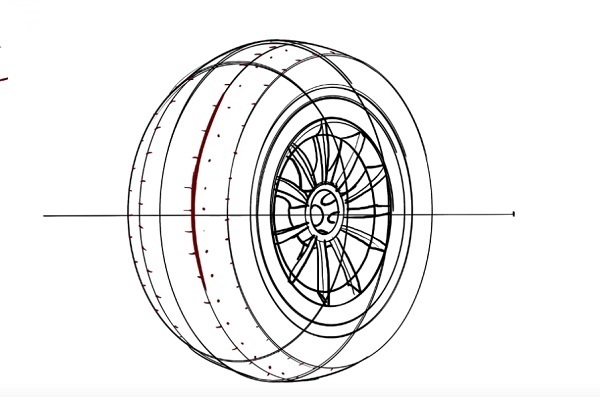
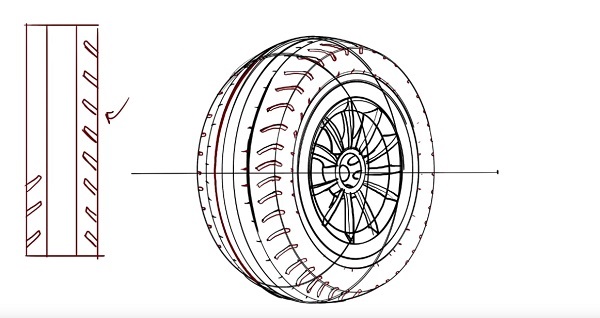
As you can see here, I am now looking at the actual thread of a tire which is the other main point where it gets its guy sort of character. So, you have got the overall bubbliness for lack of a better word of your tire, you have got the rims and you have got the tread and these are the main three points where you are going to get the kind of character off the wheel.
This is mainly based on the core construction of the wheel, how much it deviates from a regular cylinder and how much beveling it has. This is just the internal detail here which you are going to use reference for and then this also you are going to want to use reference.
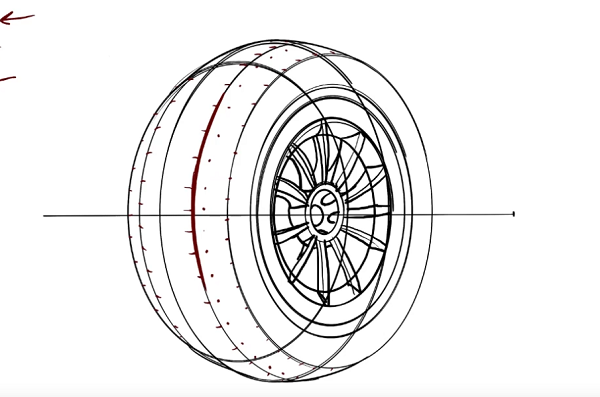
It is more detailed but its outer detail is going to run along the silhouette off your wheel. So, you will end up making tiny little bumps along the silhouette that are going to have a lot of impact as we have discussed in previous lessons. For this, I do not get too much into that silhouette because I do not want this to look like a monster truck tread that is really gripping everything around it. However, I will have little subtle Nicks and bumps and whatnot that you will see.
Now I put down these red lines here because these extra ellipses are kind of helping me to plan out the tread that I am going to put down and again I did use reference for that.
Step 8- Add Tire Details
So, as you can see in this layer, I have started putting down little points because my threads are generally quiet. There is a lot going on in the threads.
Step 9- Tire Grip Details
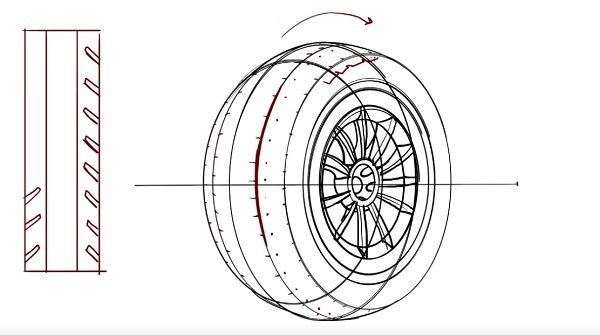
The difficult part is that while you may look at them flat on, you may see something like evenly spaced details like this where the grooves and the grip are set out like that.
Once you start wrapping it around a cylinder, you are going to find that over here as it turns away from you. The space between each section is going to start getting very compressed whereas here there is a lot more room between them up here it is getting much smaller and the same width down here. So, by putting these points and these little lines and Nick’s which are eventually going to be incorporated into the tread itself, I am giving myself a little hint as to how this space is being compressed as the surface of the wheel and the tire turns.
Step 10- Add Ellipses and Curves

I have got more of those guidelines to kind of help me place things although in this case, I think I also wanted to put an extra kind of groove. So, you can continue to add more of these ellipses and curves as you see fit to start building out the complexity and the character of this wheel.
Now, I am taking those points and I am starting to draw between them because this wheel does have these kinds of treads along the side. I want to make sure that even their curvature up here that hooks around less here, it gets kind of flattened out whereas down towards the middle you can see more of the actual curve going on.
So, all of these kinds of details are going to warp based on where you see them on the surface and how that surface is oriented relative to the viewer.
Here, as you can see, I did take these lines that I extended them but I drew out each line individually before I went and developed that detail further. This allows you to kind of solve the problem of how that line is going to flow and how that whole groove shape is going to flow.
Before you commit fully to how you want all, the more complicated bits of it are laid out. Do not jump into any one piece of detail fully in one particular place without figuring out how it is going to relate to everything else on the wheel. So, you want to kind of start with the big picture and then gradually focus on Wow, not paying too much attention to any one spot over all the others.

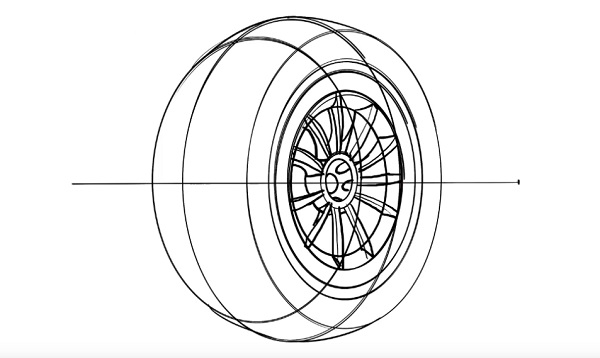
Conclusion
Finally, the last step is just a little bit of extra line and I did not really go that far with this. I did however add these little bumps here to kind of add just a little bit to the silhouette of this wheel. I did not want to go too far with it like I said before.
I did not want to give the impression of the wheel being a monster-truck wheel or on a big heavy truck. I just wanted to give a little bit of extra grip to it and that is pretty much it. So this wheel has started out as a simple 2 ellipse cylinder.
We expanded it out to get you know more of the bubble, the bevels and then we just did a lot of planning to map complex textures to the surface of a rounded form.
So, keep that in mind, when you are constructing your wheels, do not make the mistake of thinking that wheels are just cylinders, that they are just simple. There is as much character in a single wheel as there is in a whole car.